踏み台サーバーの設定
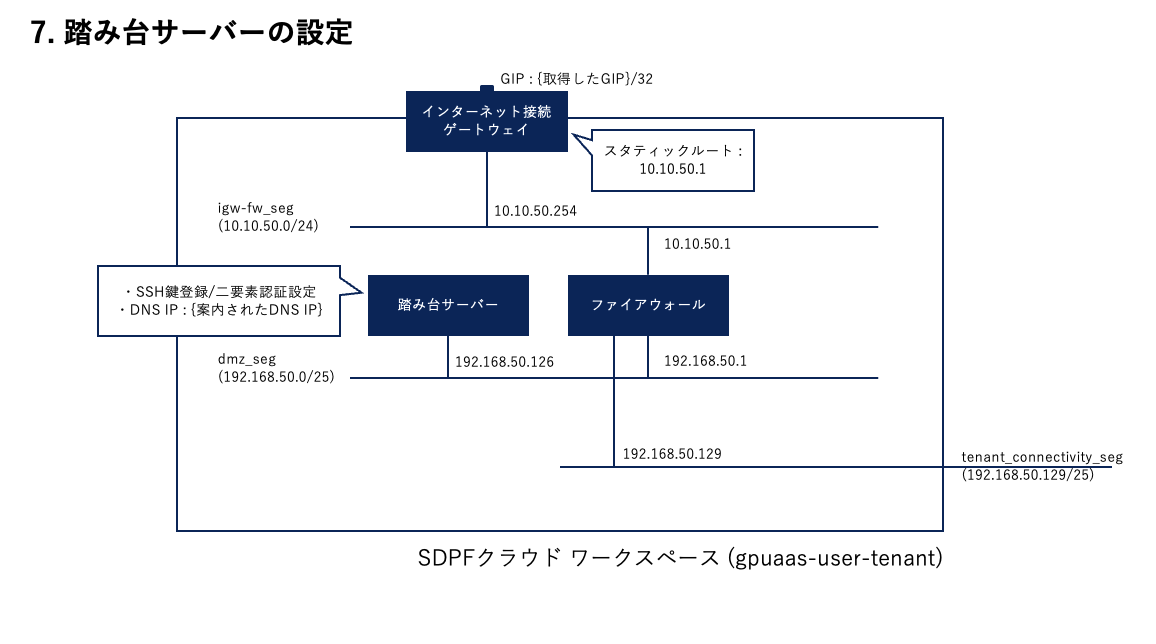
本ページのゴールイメージ
本ページではGPUaaSに実際にアクセスするために必要な踏み台サーバーなどの
設定を行います。
注釈
本ガイドで案内する構成/設定はGPUaaSにアクセスする構成の例となります。 当社が推奨する構成/設定を示すものではありませんので、 お客さまの要件に合わせて設定は変更/修正してご利用下さい。
踏み台サーバーの設定
ログイン
SDPFのコンソール画面から、「踏み台サーバーの作成」で作成した踏み台サーバーにログインします。
ユーザー名:
「踏み台サーバーの作成」にて指定したusernameパスワード: なし
パスワード設定が求められるため、パスワードを設定します。
IPアドレスを確認します。
ens3に踏み台サーバーに割り当てられたIPアドレス (今回は 192.168.50.126)が
表示されていることを確認してください。
ip a
SSH設定
SSHポートを22222に変更するために、/lib/systemd/system/ssh.socketを修正します。
sudo vi /lib/systemd/system/ssh.socket
以下の通り編集します。
[Unit]
Description=OpenBSD Secure Shell server socket
Before=sockets.target ssh.service
ConditionPathExists=!/etc/ssh/sshd_not_to_be_run

[Socket]
ListenStream=0.0.0.0:22222 ★ここを22222に修正する
Accept=no
FreeBind=yes

[Install]
WantedBy=sockets.target
RequiredBy=ssh.service
sshを再起動します。
sudo systemctl status ssh.service ssh.socket
sudo systemctl daemon-reload
sudo systemctl restart ssh.service ssh.socket
sudo systemctl status ssh.service ssh.socket
二要素認証設定
libpam-google-authenticatorをインストールします。
sudo apt install libpam-google-authenticator
Google Authenticatorの初期設定を行います。
google-authenticator
Authenticator初期設定は以下の流れで行います。
Do you want authentication tokens to be time-based (y/n)→yを入力しますQRコードとsecret keyが表示されますので、Google Authenticatorアプリを開きQRコードを読み取るか、secret keyを入力してください。
Google Authenticatorアプリで表示している6桁の番号を入力します。
Do you want me to update your "/home/dtk-qry/.google_authenticator" file? (y/n)→yを入力します以下のダイアログが表示されます。
Do you want to disallow multiple uses of the same authentication
token? This restricts you to one login about every 30s, but it increases
your chances to notice or even prevent man-in-the-middle attacks (y/n)
→ n を入力します
以下のダイアログが表示されます。
By default, a new token is generated every 30 seconds by the mobile app.
In order to compensate for possible time-skew between the client and the server,
we allow an extra token before and after the current time. This allows for a
time skew of up to 30 seconds between authentication server and client. If you
experience problems with poor time synchronization, you can increase the window
from its default size of 3 permitted codes (one previous code, the current
code, the next code) to 17 permitted codes (the 8 previous codes, the current
code, and the 8 next codes). This will permit for a time skew of up to 4 minutes
between client and server.
Do you want to do so? (y/n)
→ y を入力します
以下のダイアログが表示されます。
If the computer that you are logging into isn't hardened against brute-force
login attempts, you can enable rate-limiting for the authentication module.
By default, this limits attackers to no more than 3 login attempts every 30s.
Do you want to enable rate-limiting? (y/n)
→ y を入力します
/etc/ssh/sshd_configで二要素認証の設定を行います。
sudo vi /etc/ssh/sshd_config
編集内容
KbdInteractiveAuthentication noの行をコメントアウトします。ファイル末尾に以下を追加します。
ChallengeResponseAuthentication yes
AuthenticationMethods publickey,keyboard-interactive
PAMの設定を行います。
sudo vi /etc/pam.d/sshd
編集内容
@include common-authの行をコメントアウトします。ファイル末尾に以下を追加します。
# User settings
auth required pam_google_authenticator.so echo_verification_code
SSHを再起動します。
sudo systemctl restart ssh.service
グローバルIPアドレス経由で踏み台サーバーにSSHログインできることを確認します。
必要に応じて、秘密鍵のファイルを指定しSSHを実行してください。
ssh -i <秘密鍵のフルパス> <username>@<グローバルIP> -p 22222
NTPサーバー参照設定
systemd-timesyncdをインストールします。
sudo apt install systemd-timesyncd
ntpを有効化します。
sudo timedatectl set-ntp true
時刻同期の設定ファイルを編集します。
sudo vi /etc/systemd/timesyncd.conf
編集内容
NTPサーバーを以下の通り指定します。NTPサーバーの参照先は設定例ですので、
要求に応じて変更してください。
NTP=ntp.nict.jp
timesyncdを再起動します。
systemctl status systemd-timesyncd.service
sudo systemctl restart systemd-timesyncd
systemctl status systemd-timesyncd.service
時刻同期を確認します。
timedatectl timesync-status
timedatectl
system clock synchronized:yesの表記になっていれば、時刻同期は成功しています。
DNSの設定
GPUaaSで利用するドメインの名前解決はGPUaaSテナント側に存在する内部DNSにて行います。
resolved.confを修正します。
sudo vi /etc/systemd/resolved.conf
DNSの設定がされている行のコメントアウトを解除し、 アクセス可能なDNSサーバのIPアドレスを設定します。 内部DNS IPは「GPUaaS_テナント間接続申請情報.xlsx」の「内部DNS IPアドレス」を参照ください。
DNS=<内部DNS IP>
Domainsの設定がされている行のコメントアウトを解除し、 以下の通り編集します。
Domains=~apps.gpuaas-dev.gpu.sdpf.ntt.com
DNSの設定を反映します。
sudo systemctl restart systemd-resolved.service
ただしくDNSサーバーの設定がされているか、確認します。
resolvectl dns
以下のような表示となっていれば問題ありません。 表示が想定と異なる場合、resolve.confの編集から再度実施してください。
Global: <内部DNS IP>
Link 2 (ens3):8.8.8.8
DNSサーバーの適用対象ドメインを確認します。
resolvectl domain
以下のような表示となっていれば問題ありません。 表示が想定と異なる場合、resolve.confの編集から再度実施してください。
Global: ~apps.gpuaas-dev.gpu.sdpf.ntt.com
Link 2 (ens3):
ファイアウォール設定変更
引き続きSDPFポータルにて踏み台サーバーのコンソールから作業を行います。
踏み台サーバーからファイアウォールにSSHでアクセスします。
以下の<>内のIPアドレスを、構成に合わせて置換して設定してください。
今回はdmz_segのvSRX IPアドレスは 192.168.50.1 を設定します。
ssh root@<dmz_segのvSRX IPアドレス>
vSRXに通信の許可設定を追加します。
cli
show configuration | display set |no-more
configure
GPUaaS環境にアクセスするための設定を追記します。 本設定では、ZoneをTrustに設定し、踏み台と同じセキュリティを実施しています。
以下の<>内のIPアドレスを、構成に合わせて置換して設定してください。
今回はテナント間接続ネットワークのvSRX IPアドレスは 192.168.50.129 を設定します。
テナント間接続のGPUaaSテナント側vSRX IPには当社から仮申込みの際にご連絡する「【GPUaaS】テナント間接続申請情報」に記載のvSRX IPを設定してください。
set interfaces ge-0/0/2 unit 0 family inet address <テナント間接続ネットワークのvSRX IP>
set security zones security-zone trust interfaces ge-0/0/2.0 host-inbound-traffic system-services ssh
set security zones security-zone trust interfaces ge-0/0/2.0 host-inbound-traffic system-services ping
set routing-options static route 192.168.0.0/0 next-hop <テナント間接続のGPUaaSテナント側vSRX IP>
変更点を確認します。
show | compare
コミット確認を行います。
commit check
変更内容をコミットし、vSRXのconfig画面から抜けます。
commit
exit
設定が反映されているか、確認します。
show configuration | display set |no-more
これで、踏み台サーバーの設定作業は完了です。